

Manual Material Handling (MMH) basically means to move and handle objects manually. If you’re a worker, you most probably need to transport objects from one place to another. You can handle and transport these objects by holding, pulling, carrying, lifting, pushing, or stooping.
However, MMH is one of the main reasons for occupational fatigue all over the world. According to the International Labor Organization (ILO), roughly 340 million work-related injuries occur across the globe each year.
Additionally, transportation mishaps are primarily responsible for 37% of all fatal work-related deaths in the USA. This is painfully common in the construction industry. The main reason behind this large number is an improper work environment and wrong techniques applied to handle heavy objects manually.
Today, we’re exploring the proper ways to lift a heavy object without straining your body. Health experts worldwide have come up with a simple guideline that can reduce the risk of serious injuries while lifting heavy loads. Let’s check them out.
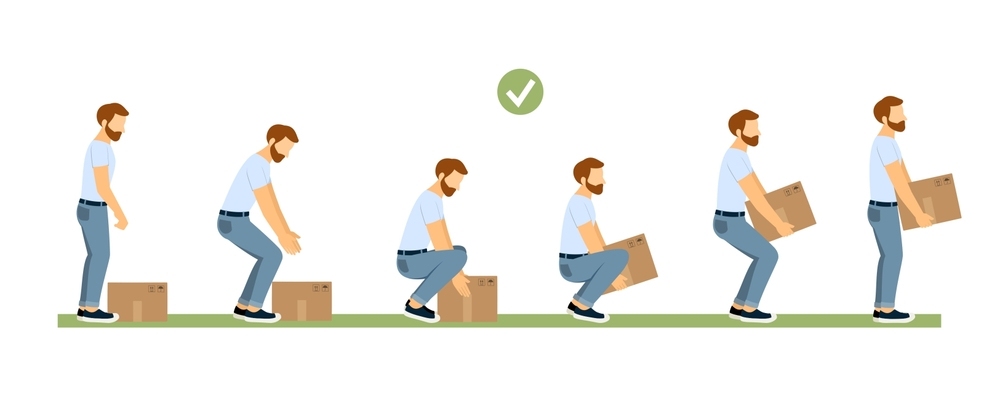
6 Steps for Proper Lifting Techniques
Step 1: Think ahead
Well planned is half done, right? The importance of planning ahead is crucial in manual lifting. You have to make sure that the path you’re going to take is dry and free of any obstacles. Plan the route you’ll be taking beforehand and make sure that the path is as risk-free as possible.
Don’t forget to scale the approximate weight of the object before you start lifting. If you think it’s risky for you to lift the weight alone, ask for help. It’s never okay to lift more weight than you can safely carry. Decide which equipment to use (if any) and how you’re going to use it.
In other words, plan the whole workflow beforehand to minimize risk factors. It’s also a great idea to stretch your body a little before you start. Ask yourself these questions to assess the situation correctly:
- Where is the load going; is the destination ready?
- How should you approach the weight?
- What is your personal load capacity?
- What is the approximate weight of the object?
- Do you need assistance?
- Can the weight be distributed into smaller parts?
Step 2: Position your feet
The next technique is about the right approach. Get closer to the object and place your feet apart, forming a stable base for lifting. Keep the leading leg as far as you’re comfortable and point in the direction you want to move.
Your choice of clothing is also important as tight or uncomfortable clothing or footwear can make your job a lot harder. Don’t keep your legs rigid, become comfortable as you place one foot alongside the object and the other slightly behind. This posture provides good balance as you lift the weight.
Now, decide where you want to grip the object. Place your hands around the object and find a good place to grip. Avoid sharp edges and oily/greasy parts that’ll make holding the object more difficult. You can lean forward a little to secure a strong grip.
Step 3: Maintain a steady posture
Once you have a secured hold over the object, it’s time to lift it. Prepare your legs to move as you might need to move them to ensure a stable posture. Generate a thrust upward using your rear foot and keep the object closer to your waist.
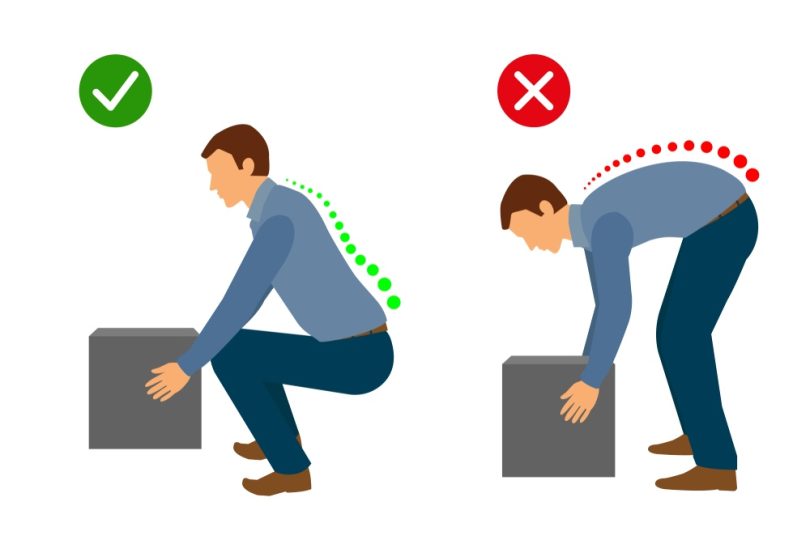
Use your whole palm to grip rather than using just the fingers. Don’t forget to bend your knees and keep your back straight. This will maintain the natural curve of your backbone, providing better support. Your footing also should be stable, spread your legs to each side of the load.
Avoid flexing your back, hips, and knees completely as this can increase the chance of injuries. Also, try not to twist your body while lifting the weight. Keep your shoulders level and facing the same direction as your hips all the time.
Step 4: Lift
Once you have a stable hold onto the load, it’s time to lift it. Hold the obstacle tightly as you look ahead. You don’t have to look down at the load. For safe lifting, keep the load as close to your body as possible. Keep your arms within the boundary that you created with your legs.
Use the stretching of your legs to lift the load. Bend your knees, not your waist. Remember, the muscles in your legs are stronger than the muscles in your back. Avoid jerking or twisting your body as it can put a heavy strain on your back.
Don’t forget to place the object inside your power zone. It’s a special zone close to your body where your arm and your back will be able to lift the most amount of weight with the least amount of effort. The power zone is located between your mid-thigh and mid-chest.
Step 5: Transport the weight
Once you successfully lifted the weight, it’s time to transport it to the desired location. Try to keep your hand forward while carrying the weight. If the weight isn’t evenly distributed, keep the heavier side closer to your body as it’ll help you maintain balance.
Use small steps and make sure you don’t overdo it. Try to keep your arm straight as it’ll improve your balance while carrying the load. If you need to turn, use your foot to lead and let your body follow.
Don’t hesitate to ask for help if needed. When it comes to lifting heavy weights, knowing your limit can help you avoid any unnecessary injuries. Just because you can lift a weight doesn’t mean you can do it safely.
Step 6: Unloading
This is the last step. Once you arrive at your destination with the load, put the load down first and then adjust the position if needed. Lower the object by bending your knees. Keep the load closer to your body.
Don’t forget to maintain the same posture when you lift the object. Keep the load closer to your waist, your head up, and tighten your stomach muscles. If you lift a lot of weight on a regular basis, don’t forget to stop and rest every once in a while.
Do’s and Don’Ts of Manual Lifting
Do’s
- Estimate or if possible scale the weight beforehand
- Use ergonomic list assists if needed; ask for help
- Plan ahead and keep your path clean
- Keep the load inside your power zone
- Lift the load using your legs
- Increase balance with a wide stance
- Try to bend your knees rather than your hip
- If a good grip isn’t available, try to create one
- Wear protective clothing
- Keep your nose, shoulder, hip, and toes in the same forward direction
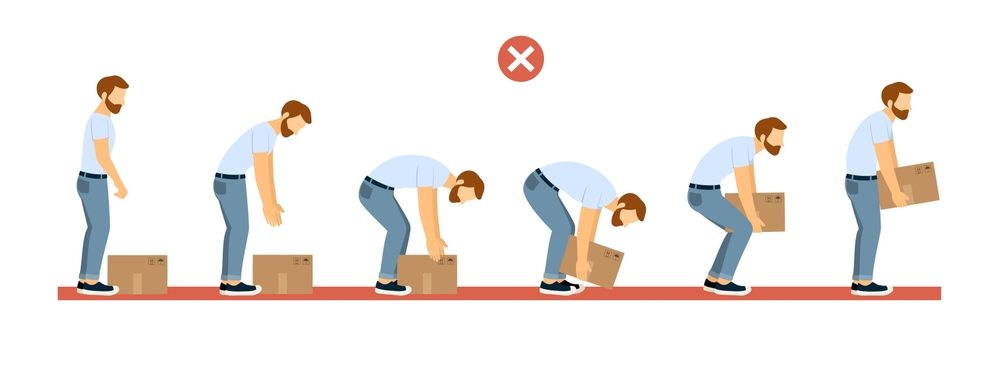
Don’ts
- Don’t twist your body when you lift the load
- Don’t try to carry too heavy or too large objects
- Don’t hold your breath
- Don’t use a partial grip with 1-2 fingers
- Don’t try to lift the load if you are fatigued
- Don’t pinch your toes or fingers
- Don’t if you can push, don’t pull
- Don’t lift loads that are above your shoulder level
- Don’t rush through the process
- Don’t block your vision while carrying
- Don’t try to bend forward instead of squatting down
FAQs
- Can back belts help lift more weight?
Ans: No, there is no scientific evidence that using beck belts helps lift heavier loads. Instead, they can create a false sense of strength, and that is dangerous. Their job is to hold your backbone in one place, not to strengthen it.


Leave a Comment