

Any home-based Diyer can replace any type of window lock if guided right. We’re here to help you just with that!
With this guide, you will be able to replace:
- Sash locks
- Espag locks
- Casement locks
- Sliding security locks
- Window tilt latches
- Positive action locks
Methods to Replace Window Locks
-
Sash lock on a double-hung vinyl window
Things you need
- Replacement locksets
- Impact driver/Cordless drill
- Rivet gun
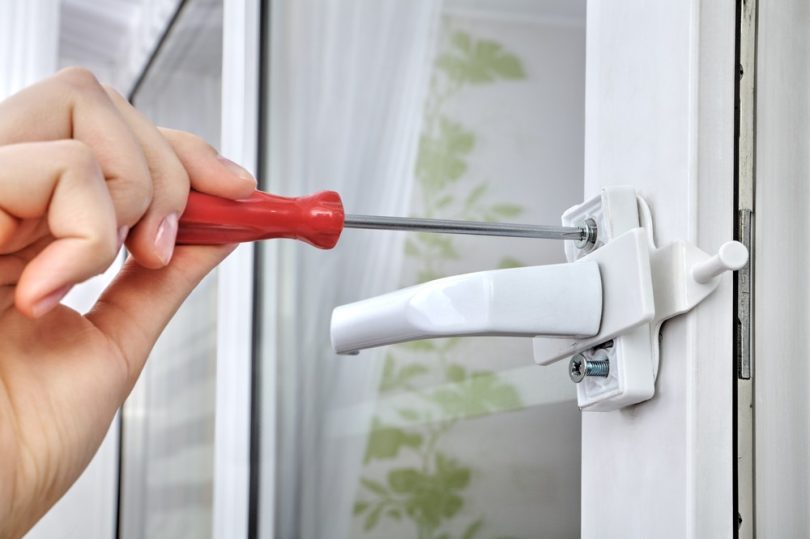
- Safety glasses
Steps
- Unscrew and remove the existing lock. In case the locks are riveted in place, you’ll have to drill out the rivets carefully without damaging the window sill. Make sure your drill bit is the exact size as the rivet.
- Set the new lock and the keeper in place of the old lock and fix it in position with the rivet gun. You can choose to seal the lock with screws or drive rivets into the holes.
-
Espag locks in a uPVC window
Things you need
- Replacement locksets
- Screwdriver
- Sharp-tip knife
Steps
- Remove the handle. Ease off the screw cover with a knife tip to remove the screws holding the handle.
- Now remove the top screw first, then turn the handle to reveal the bottom screw. You’ll see the spindle once you remove the handle.
- Remove the screws along the faceplate side of the lock so the lock falls apart completely.
- Measure the lock and the spindle length from the underside of the old handle. Reassemble to measure in case the handle or lock is broken.
- Get the replacement according to the measurement of the old lock and handle so it’ll fit the old holes perfectly.
- Replace the new Espag lock in the receiver in the frame. Fit the lock in the recess by lining it with the screw holes. Attach the new locksets using a screwdriver.
- Unscrew and reposition the receiver if you need slight adjustments.
- Check to see if the mechanism and lock work correctly. Fit the screw-cover cap and make sure the lock is nice and secured.
-
Replace Casement Window locks
Things you need
- Replacement locksets
- Screwdriver
Steps
- Remove the old lock from the sash. Unlock and open the window sash first, then place the screen aside if present. Remove the screws and the backing plate from the outside of the window and keep the orientation in mind.
- Install the new lock. Press the replacement lock through the slot in the window frame. Line up the fork perfectly and allow it to engage the pin. Place the new backing plate in the same spot the old one was in before.
- Secure the plate in place using a screwdriver. Go ahead and close the sash to test if the replacement lock works
-
Awning window locks
Things you need
- Replacement locksets
- Safety glasses
- Screwdriver
- battery drill/driver
- Thin pencil
- Drill bit sets
- 3-inch+ nail
Steps
- Unscrew and remove the broken lock from the window frame.
- Take the new locksets and remove the cluster cases to reveal the screw holes. Mount the spacer on the sill and place the lock on top of it. The spacer keeps the window lock from catching on the sill as you open and close the window.
- Mark where the screw holes need to be drilled with a nail or a pencil. Place the lock on the sash and push a nail inside the holes on the lock until the marks are visible.
- Drill the screw holes. Make sure to keep the window open while you drill to avoid any scratch marks on the window frame. Use a drill bit that fits the size of the shank of the screws. You can install the lock anywhere you like on the window, but putting it to one side; to the corner of the sash is a good rule of thumb.
- Once you’ve drilled the holes, go ahead and fit the window lock to the sash. You may start with a hand screwdriver and finish off with a battery driver. The window lock should be in position.
- Now install the striker plate and the bolt. Push the bolt hard into the lock so it leaves a mark on the seal. Drill a hole on the mark using a drill bit slightly thicker than the bolt to allow the spot-on positioning. Set the striker plate keeping the hole in the middle. Drill pilot holes on two sides of the striker plate and screw it into position.
- Replace the screw caps to complete the installation process. Check if the lock is working just right.
-
Sliding window security locks
Things you need
- Replacement sliding window lock
- A regular hammer
- Flat blade manual screwdriver
Steps
- Remove the secondary locking device first. If you find it too hard to remove the broken sliding window lock by hand, try tapping with a flat blade screwdriver and hammer to release the hold and remove the lock.
- Install the new sliding window lock. Move the ball bearing of the sliding window lock to the center which is the widest point of the lock. This allows you to place the lock over the track edge at the preferred distance you want the sash to stop. Make sure the rounded edge is facing the window.
-
Window tilt latch
Things you need
- Replacement tilt latch
- A regular hammer
- Flat-head hand screwdriver
Steps
- Remove the old tilt latch. Unlock and lift the window. Tilt the window in towards you. Place your flat-head screwdriver at the end of the latch and tap it out using the hammer.
- Put the new tilt latch in. Push the latch into the groove on the window frame and that will be it. Place your window back in place.
-
Positive action locks on windows
Things you need
- Replacement positive action lockset
- Phillips head screwdriver
- Putty knife
Steps:
- Remove the window sash first. Pop-out the takeout clips (at the side of the window) at a 45 ° angle with a gentle push of your finger.
- Now remove the sash stops at the corner of the window. Slide up the sash until it disengages. When both sides catch on the take-out clips, slide out the sash to one side to remove.
- Install the new positive action lock. Line up the lock with the pre-punched holes in the sash. Fasten the new lock to the sash and fit the screw cover.
Note: Slide a screwdriver over the stiffener bar in case the screw holes are stripped. The stiffener bar is placed inside the upper rail of the sash.
- Remove the screw cover cap with a knife. Unscrew and remove the old lock from the vinyl frame.
- Reinsert the sash into the window frame. Place the sash above the base of the balancer, line up and push it in. You may move it back and forth up until both tops catch. Push in the take-out clips, close the sash, and reinstall your sash stops.
FAQs
1. What are window locks called?
Ans: They’re often called “window latches.” A window latch is the type of standard lock you’ll find on single and double-hung windows. They are simple mechanisms that connect two window sashes and stop them from moving.
2. How many types of door locks are there?
Ans: The door locks come in a range of styles but most of them fall into 7 categories. They are – cam locks, knob locks, padlocks, keypad locks, mortise locks, deadbolt locks, and smart locks.


Leave a Comment